I tend to be pretty slow in making a jewelry piece after I buy beads. Especially if I really like the beads, I feel like I have to wait until I've designed something really special before I use them. I've got a cool necklace tutorial to share with you today that is finally the result of a design I deemed "special" enough to use some fun stone drop beads I bought at Beadfest Spring. Considering Beadfest Summer was just this past weekend, it was high time for me to make SOMETHING with the beads I bought at the last show!!
Today I'm sharing a
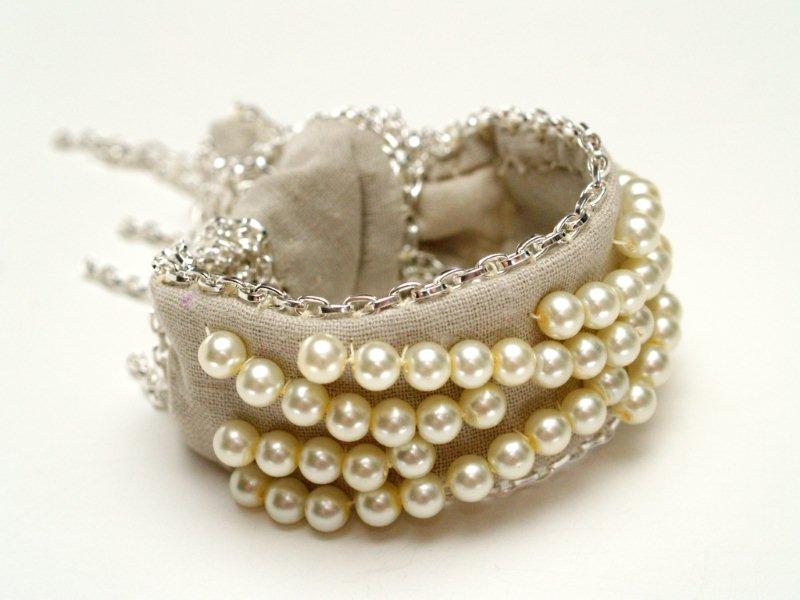
DIY Wire Wrapped Chain Statement Necklace
My favorite part about this necklace are the round beads that I wire wrapped onto the chain. I've never tried it before and I think it adds such a cool design element to the necklace!
If you are interested in making your own version, here's how to do it!
Supplies:
Stone drop beads, crystal rounds, round stone beads,
chunky cable chain, 26 gauge wire, head pins, eye pins, jump rings and a clasp. You will also need wire cutters, needle nose pliers and round nose pliers.
Steps:
First step is to make the beaded dangles. To start, string a stone drop bead onto a head pin.
Use needle nose pliers to bend the wire 90 degrees directly above the bead
Use wire cutters to trim off all but about a half inch tail
Grasp the end of the tail using round nose pliers and bend into a circle, creating a simple loop
Use needle nose pliers to attach this simple loop onto an eye pin
String a crystal round bead onto the eye pin
Create another simple loop directly above the crystal bead and attach a 6mm jump ring to that simple loop and close with needle nose pliers.
Make a bunch of those dangles and set aside. Next step is to wire wrap the stone beads onto the chain. To start, cut as long of a piece of wire as you are comfortable using at once.
Count three links in from the end of the chain and thread the end of the wire through the next link. String it through the fourth link back into the third link, and wrap the tail multiple times around the joined links to secure the wire in place.
Pull the wire tight with needle nose pliers and then trim off any tail on the short piece. On the long piece of wire that is remaining, string on a stone round bead and position it in the center of the fourth chain link.
Wrap the wire tail through the fifth link, back up into the fourth link, and then string on another round bead and position it in the center of the fifth link.
Continue this pattern of stringing on a bead and wrapping once between each link as you wrap down the chain. If you run out of wire just wrap the wire around the chain link it stops at a couple times to secure, and then start over with another piece of wire by wrapping it onto the same link to secure and continue wrapping.
When you're done the chain should look like this:
Next step is to attach the beaded dangles to the chain. Start in the middle of the chain and open up the jump ring on the end of a dangle, string it onto the bottom link of your chain, and then squeeze the jump ring shut using needle nose pliers.
Repeat this process until you've filled up your chain
After all your dangles are attached, all that's left is to attach a clasp! I attached a lobster claw clasp to one end of the chain using a jump ring and an extender chain to the other side of the chain end using a jump ring so I could have a few different length options when I wear the necklace.
After the clasp is attached your necklace is ready to wear!
I just love the close up detail on this neckalce. The beads are all the same color but each one is a different size or shape so it all matches but still has variety!
Of course I ALWAYS love a good statement necklace, and this one looks great on :)
And here's a little cell phone selfie I took wearing the necklace on my way into Beadfest this weekend. I decided to wear my new necklace because I think it's an unwritten rule that to get in the doors of Beadfest you have to wear some of your own handmade jewels!
I got some fun new beads to play with again at the show this time, so we'll see when I get around to designing something "special" enough to use them on!!