Owl Paper Lantern Tutorial


This post was originally used as a guest post over on the Paint Me Plaid blog. If you missed it there, here it is again!

Today I'm going to show you how to make these owl paper lanterns!

I found these paper lanterns for $1 at the dollar store while in search for decorations for my sister's owl themed baby shower. They are pretty ugly as is, but I got an idea to spruce them up a bit using some Apple Barrel paint!

I picked three different paint colors that coordinated well with the owl/woodland/orange theme of the shower. 

And squeezed the paint directly onto the lantern...

and then gently bushed it out all over the lantern. 

After the paint dried I cut out pieces of card stock for the eyes and nose and hot glued them on.

I also traced out little feet with card stock.

And then cut them out and hot glued them onto the bottom of the lantern.

Lastly, I cut out wings and hot glued them to the side of the lantern.

Then ta-da! I cute little owl lantern!

I made three of them and hung them off a light above the kitchen table where the food was for the shower. The owls were the perfect touch for the shower! 


I'll be sharing this with all the link parties in my header including Today's Creative BlogSerenity Now, Christina's Adventures.

Project Accessory Episode #1 Review


So, if you read this post you would know that I was super excited for the premier of Project Accessory.

After all the hype I gave it, I figured I might as well share my thoughts on it so far!! 

Note: All images in this post taken from www.mylifetime.com

The show is set up almost exactly the same as Project Runway is. Designers, host, judges, mentor, challenges, runway show, tacky scripting and all. I mean, come on Project Runway. We all knowwwww one day in fashion you're in, and then the next you're out. You do not need to tell us every stinking episode. Time to get some new script writers and add a little flair. Maybe crack open a thesaurus. Might doya good. Anyway. I digress. 

The show is hosted by Molly Sims and judged by Molly, Ariel Foxman, and Kenneth Cole. Molly does a decent job, but it's kind of hard to fill Heidi Klum's stilettos. I wish she would have tried to make the host role more her own than trying to be exactly like Heidi was.

Same goes for mentor Eva Jeanbart - Lorenzotti

Her time in the workroom with the designers felt kind of awkward. Maybe it's just because she lacks the vocabulary Tim Gunn has. There was no mention of any flotsam or jetsome at any point in the episode. 

For the first challenge the designers were given a pair of jeans and a white t-shirt, and were sent to a storage bin to dig for supplies. Using those supplies they had to make three accessories to dress up the t-shirt and jeans.

Starting with the good. The winning look was done by the contestant Nina. 
 

I LOVED this necklace, and totally thought she deserved to win. The necklace was made out of parts from a parasol, a rat trap, and matches. Isn't it stunning!!?? She also made a pretty neat belt and ring which I felt was kind of like a throw away....but the necklace was so great that I didn't even care.

The losing look came from designer Cotrice.  
 
Personally I don't think she entirely deserved to go home. I think the necklace she made was STUNNING, but it was made out of beads from a chandelier, which is kind of lame for the first work-with-funky-materials challenge. The judges mainly sent her home because the look was too much. The funky corset that is holding up the model's boobs with the strangely placed beading was just awful. And then she also colored the tshirt and just made the whole look confusing. 

Also in the top were pieces done by Brian and Diego.
Brian made the belt on the left out of an old couch and teddy bears. Personally, I think anyone who tears apart a cute little teddy bear to make a thow-up-reminiscent belt should be sent to teddy bear jail. Gag. I have no idea why he was in the top. Diego made an awesome clutch and also the necklace above on the right. I loved the necklace because it was made out of spray painted pleather, and on the model on the runway it totally looked like a very expensive metal collar necklace. 

Designer James was in the bottom with these two pieces: 
Which I really hated. They don't look as bad on a mannequin as a real person. Check it out: 

What woman wants to add 2 inches to her hips on either side due to fluffy ugly white flowers? And I don't even think The Little Mermaid would sport THAT many shells around her neck. Personally, I think James deserved to go home over Cotrice, but what do I know. I'm just a DIY crafty blogger gal.  

Overall, I like the show. I think they should have tried to differentiate it from Project Runway a littttle more. Even though both shows have Project in the name does not need mean they have to be twinsies. Come up with some new phrases, switch up the script a bit folks. But, in the end, I'm excited for the new challenges that will be coming up and what looks and DIY ideas I get!

I'll stay tuned for next week. 

Guest Post: Thanks, I Made It


Hello! I'm Erin from over at Thanks, I Made It. I love fashionable DIYs, and especially love making jewelry to create luxe looks for less. I was so excited when Rebecca asked me to guest post here on My Girlish Whims today. She has some awesome tutorials, and is a talented jewelry maker. Check out this DIY tutorial from my blog, and be sure check out Thanks, I Made It for more DIY fun!


(L to R: Kenneth Jay Lane, Gemma Redux, Fenton. Images via charmandchain.com)

Fall here in New York was off to a very wet and grey start, so I had to create my own sunshine. What better way than colorful rays from a spiky necklace? The necklace from Gemma Redux, above, uses stone fan pendant beads. I tried making some of my own beads of this shape with polymer clay... but things looked a little wonky and they now RIP in my graveyard of botched projects.  

I found a strand of spiky turquoise beads at a bead store for about 15 bucks and had all the other supplies, so it was a cool $400 less than buying the real Gemma Redux deal. 

Tools and materials:

Beads of varying lengths
Chain
Eye pins, jump rings, clasp
Needle-nose pliers

(Oh hey computer)

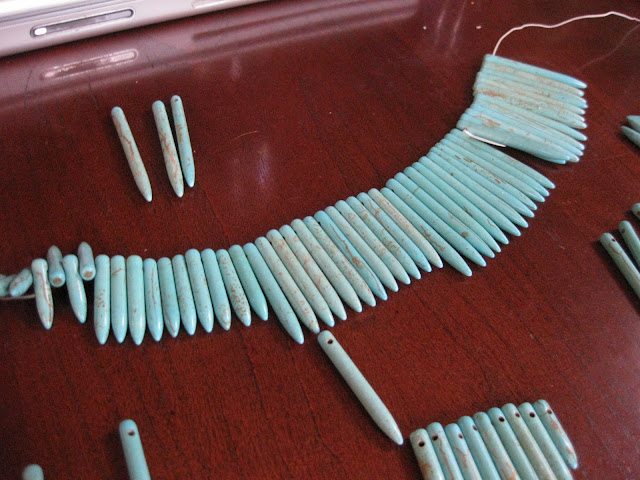
First, organize the beads to create triangle sections, like below.


 Slide beads onto an eye pin. Trim the pin if necessary, and bend into awire loop (here's how to).


Repeat four more times.

Connect the sections together with jump rings.

Using the jump rings, attach chain and a clasp.


You're done! While a much cheaper (and lovingly handmade) than the original, you should check out the Gemma Redux collection. There are some absolute stunners using stone beads of staggered length that provide loads of inspiration.

And let's head outside for the glamour shot. Thanks for having me here today Rebecca! I would love it if any of you head over to Thanks, I Made It to say hello! You can also keep up with me on Pinterest and Bloglovin'!


Groop Dealz Wrap-Up

You may have remember me mentioning recently that I did a Groop Dealz!  

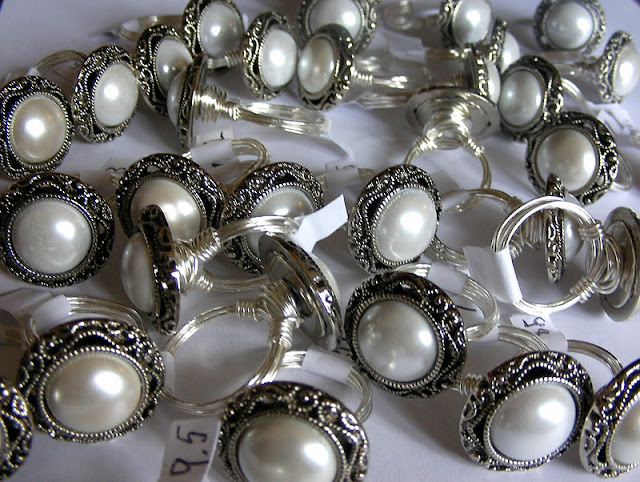
Just wanted to share some pictures off the rings I shipped out after they were all made.

Sooooo many pretty rings :)

 Carefully nestled in a box....

And tied up with a girly colored ribbon!

I also took the time to write everyone a handwritten note on letterhead I got from UPrinting! Love that stuff.

 Hope everyone enjoyed their ring! It's still available here in my etsy shop in any size you want!

PROJECT ACCESSORY

Today I logged onto www.mylifetime.com to watch Project Runway while making jewelry.

AND THIS IS WHAT I SAW:


PROJECT ACCESSORY IS PREMIERING TOMORROW!!!!!!!!!!!

Background. I've loved Project Runway from the start. So much so, that sometimes when I'm making jewelry, I pretend that I'm on "Project Jewelry Runway."  Crazy challenges, time constraints, Tim Gun and all. True Confession. 

AND NOW IT KIND OF EXISTS!!!!

According to Hollywood Reporter: "The format of the show will follow that of Project Runway, but competing designers will be creating accessories including shoes, handbags, jewelry and hair pieces."

It's like all my dreams come true.....


 I hope it does well so I can bump up the fashion in my designs and audition for next season!!

Your Whims Wednesday #30 {And Features}

It's time for another party!!! 

 Here are some of the projects that I loved from last week:

Messy Side Up-Do from The Small Things

Pallet Headboard from The Rooster and the Hen

Felt Dahlia Headband by Little Amara Designs

Easy Pain Au Chocolat by Simply Designing

Birdie Love T-Shirt Craptastic


 Thanks to all who linked up! Grab a button if you were featured :)

Featured on My Girlish Whims

Now... onto this weeks party!

I show off my girlish whims weekly on my blog, and now I want to see yours with 
Your Whims Wednesday!

Guidlines:
1. Link up as many projects as you would like: as long as it is one of your girly ways, you can link it! I'd love to see crafts, recipes, style posts, etc. Anything and everything feminine :)
2.Please add my button (code below) to either your blog post or somewhere on your blog. 
3. Take a quick moment to comment on at least one other entry. We we all love comments!! 
4.I'd love if you would follow me as well :)

New Earrings in the Shop

Added some new goodies to my Etsy shop today! 

Also, I never officially announced here on the blog, but I now ship everywhere!!! Previously I only shipped to the US, but I finally got around to updating my shipping profiles. So now you can indulge Your Girlish Whims where ever you live :)

Here's what I added today:


Oh...and I also added one bracelet. But I didn't feel like titling this post "new earrings and one lonely bracelet in the shop"...so here it is as a surprise haha! 


And while I'm doing some shameless self promotion....

Use discount code "4MONTHS" to get 15% off any order until Sunday this week!

PS: The code 4 months because today marks the official 4 month mark until my wedding! It's getting closer!!