This weekend I had an awesome time making pretty jewelry with some lovely supplies from Beadmixer! Weekends are my crafting time and nothing drives me more crazy than sitting around for an hour or more in my craft room on a Saturday trying to figure out what to bead next. I had so many pretty rhinestone beads to craft with this weekend though that my creative juices kept flowing! It also helped that I woke up SUPER early both days this weekend unintentionally. You can get so much done when you wake up early! By 10:30AM on Saturday and I had already finished a movie (I always watch TV while I bead!) which I though was pretty crazy. Here's what I spent those morning hours working on:

DIY Rhinestone Statement Necklace
I just love this new necklace so much! Honestly it is my new favorite. I liked it while I was crafting it but as soon as I tried it on with an actual outfit (I craft in comfy clothes!!!) I knew I liked it sooooo much more! It instantly transforms and outfit from nice to yeahhhh baby. Hah! Seriously though! The rhinestones will make any outfit instantly fancy and classic.
I just love this new necklace so much! Honestly it is my new favorite. I liked it while I was crafting it but as soon as I tried it on with an actual outfit (I craft in comfy clothes!!!) I knew I liked it sooooo much more! It instantly transforms and outfit from nice to yeahhhh baby. Hah! Seriously though! The rhinestones will make any outfit instantly fancy and classic.

Want to learn how to make your own??? Here's how!
Supplies:
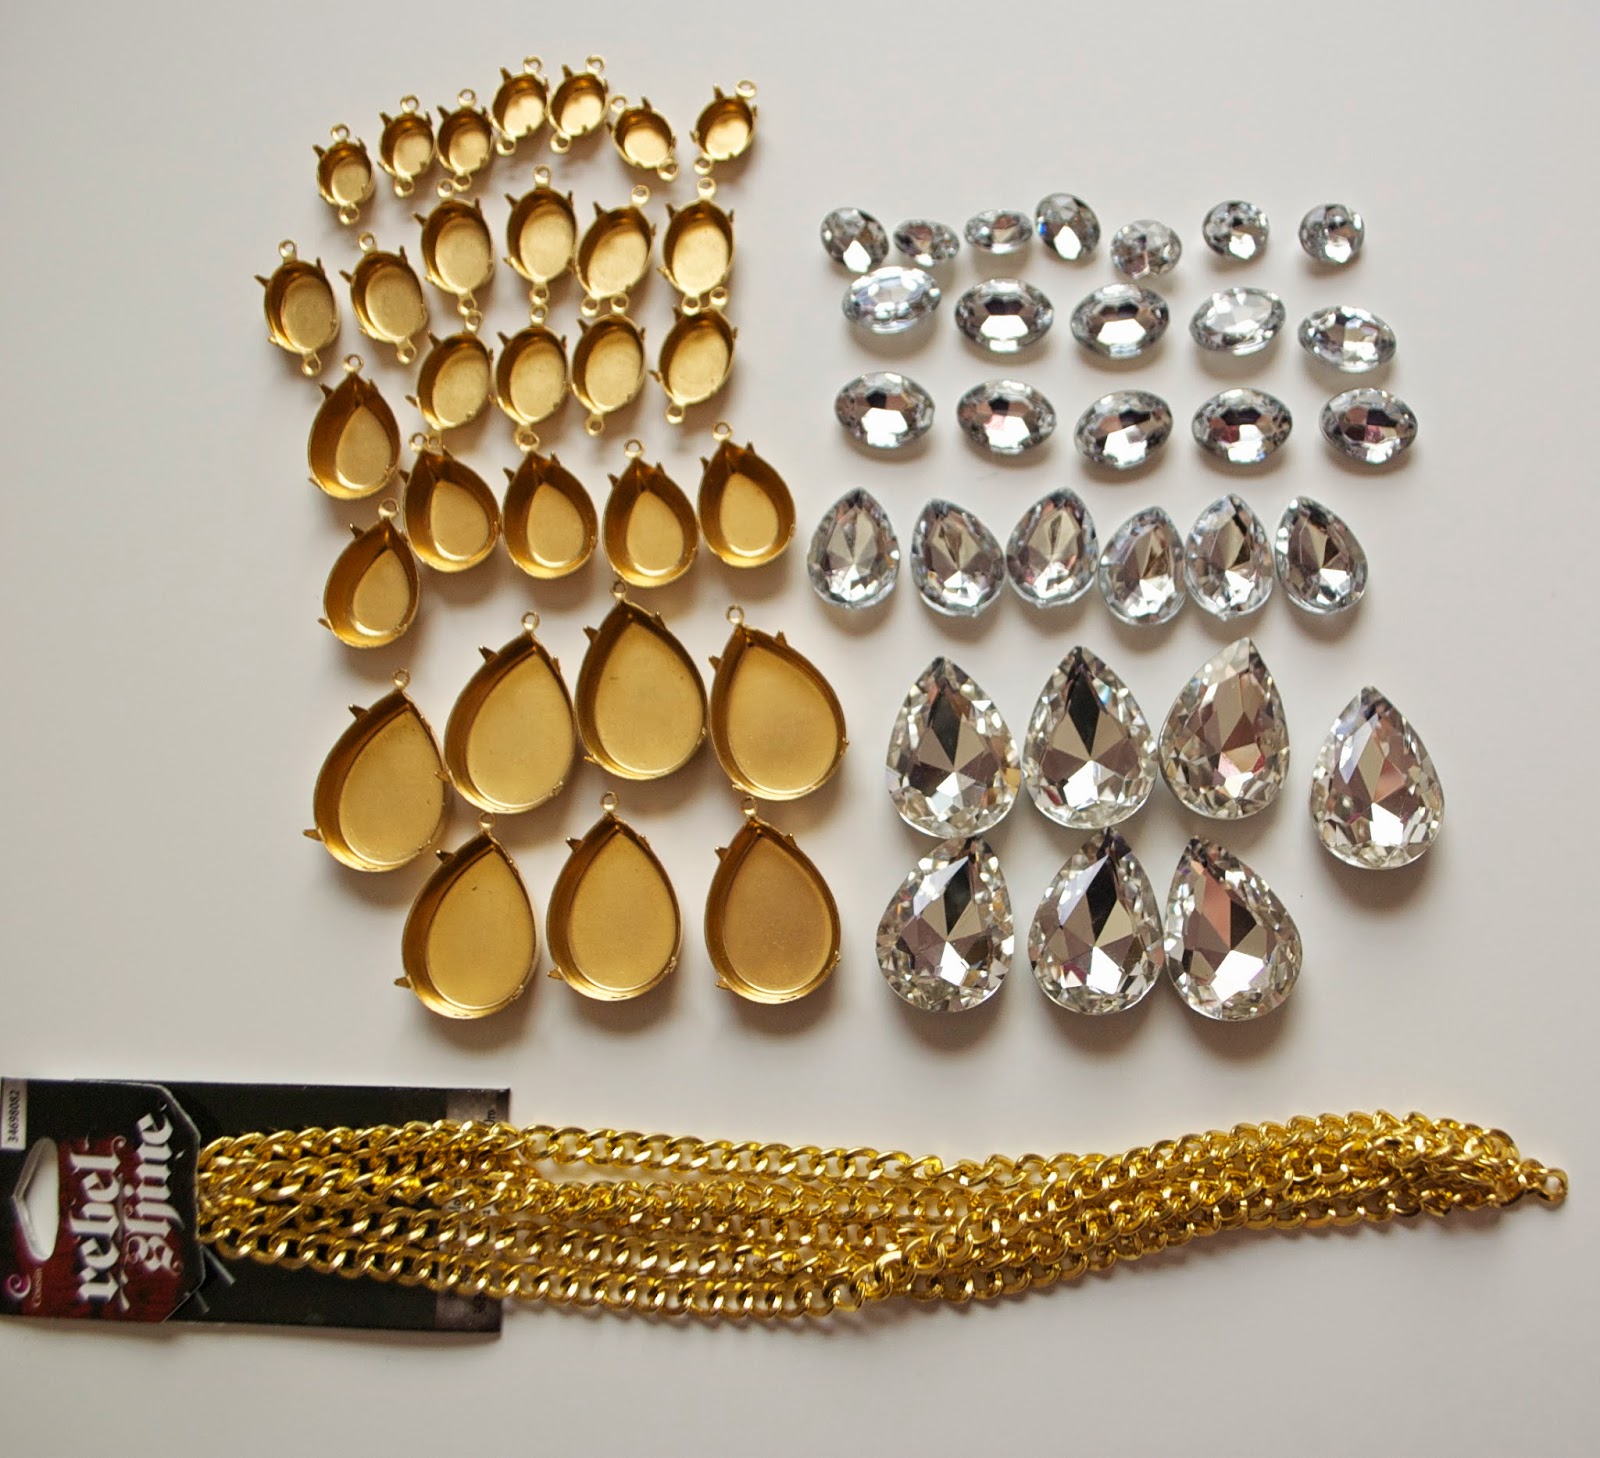
Needed to make this necklace: 25x18mm teardrop crystals, 25x18 settings,18x13mm teardrop crystals, 18x13mm settings, 14x10mm oval crystals, 14x10mm settings, 10x8mm oval crystals, 10x8mm settings, gold chain, small jump rings and a clasp.
All of my beads are from beadmixer.co.uk which is an AWESOME resource for crystal/rhinestone beads. All extra findings are from Cousin Corp.
Steps:
First step is to place the rhinestone beads into their settings and secure. Each setting has four prongs to close around the rhinestone beads to secure in place. I used my traditional needle nose pliers to close each prong but BE CAREFUL not to slip and scratch the crystal! If you are worried about this happening you could dip your pliers into Tool Magic to give a protective layer to the pliers so they won't scratch the crystal.

Assemble all crystals into their settings like so:

Now for the fun part: time to make a necklace! Start to assemble the necklace like so: using the largest oval beads create a chain of 8 of them with three small jump rings in between. Three is important to make sure the necklace lays properly. After the ovals are assembled use another small jump ring to attach the large teardrop bead to the center jump ring in each strand.

Here is how the first link should look when connected with the jump rings (if you need help with this step you can learn how to use jump rings)

Continue this pattern until you have a strand featuring 7 of the large teardrop beads.

Next, assemble a similar strand using the smaller teardrop beads and ovals.

Using another jump ring (slightly larger size) to attach the two different sized oval beads on the end of each side of the necklace to a piece of chain.

Attach a lobster claw clasp and jump ring to the end of the chain on either side to finish off the necklace.

That's all there is to it!!! All the jewelry knowledge you really need to know is how to use jump rings and how to place the crystals in the settings which is not hard. This was my first time doing it actually! The necklace might look intimidating but the techniques are very basic.

It totally looks like I bought this necklace at some fancy department store - right??


So pretty!
ReplyDeletebisous
Suzanne
wow I love the design! so fancy : )
ReplyDeleteNice resource for rhinestones.
ReplyDeleteThis is gorgeous!! Love it. I really want to make one now haha
ReplyDeletehow much did it cost you?
Jessi
www.haircutandgeneralattitude.com
Love this necklace! But, where did you purchase the settings?
ReplyDeletePam, all the supplies are linked to in the post!
ReplyDeleteThanks for your great tips
ReplyDeletepoker online Terpercaya
poker online uang asli
Judi Online poker Terbesar
Bandar Togel
Agen Togel Terpercaya
togel online
judi togel
judi bola
I like your all post. You have done really good work.
ReplyDeleteSITUS JUDI POKER
JUDI BOLA
BANDAR TOGEL
POKER TERPERCAYA
FILM BOKEP TERBARU
NONTON FILM BOKEP
Cute DIY making.
ReplyDeleteFirst, make sure you have a large, flat and clean surface to work on. The last thing you want is to not have enough room or be on an angle and have your precious rhinestones fall off and you have to spend time trying to locate and recover them before the kiddo or dog does.wholesale rhinestones
ReplyDelete