Showing posts with label DIY. Show all posts

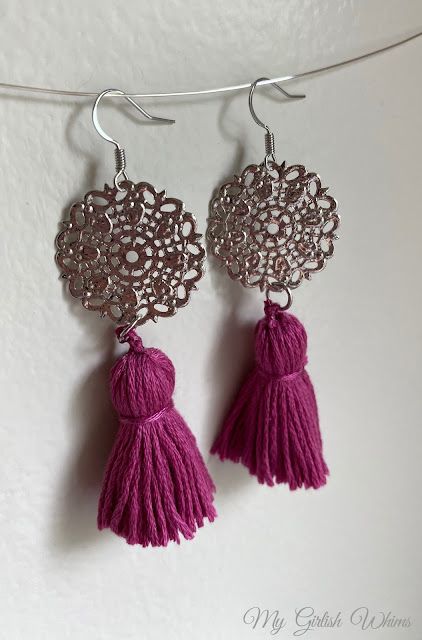
How to Make Tassel Earrings

During quarantine, I've had a lot of time to spend up at my beading desk and I'm excited to finally be back with an easy DIY tutorial for another jewelry project!


Digging through my stash of craft supplies I found a bunch of these round metal accent beads that I thought would make great earring components.  I also found tons of embroidery thread from circa 2010 when I randomly decided to take up embroidery (I actually have a bunch of old embroidery projects in the archive of this blog!) so I figured I would be all set to bang out a bunch of tassel earrings!


This is actually a very simple jewelry project.  The tassels really only need scissors and some knots and glue to form, and the only jewelry making skills you need to know is how to use jump rings and how to use a pair of needle nose pliers to open earring hooks. Both are super simple to do and are outlined in the steps of this post.


This was a fun and relaxing project that I've enjoyed working on while bingeing lots of Netflix shows. Someday when this is all over, I think I will forever remember the quarantine of 2020 whenever I wear these earrings.

 
I really haven't done many other productive things during quarantine (I've said I'm going to get into the basement and sort through more of my old clothes for like 4 weeks straight now) but at least I've been a productive jewelry maker :) All of these different colors and sizes together just make me so happy!


Ready to learn how to make your own pair? Here's what you will need to get started!

Supplies:

To make these earrings you will need one skein of embroidery thread, needle nose pliers, two jump rings, two earring hooks, metal accents, E600 glue and at least one pair of sharp scissors.

My metal accents were ones that can be found at any regular craft store in the jewelry section: I'm sure this exact set is no longer available but you can easily sub in another charm or link: you really just need something with holes in it that you can attach a jump ring and earring hooks to!

Steps:  

To start: even out the skein of embroidery thread as much as possible by gathering the loops on each side and arranging them in order so the thread lays as flat and even as possible.

Use scissors to cut the ends on each end of the skein so there are no more loop

 Separate 4 strands from the main pile and save for later

Now fold the strings in half and cut the loop

Keep them separated so you are left with two even bundles

Use two of the reserved strands to tie a knot in the center of each bundle

Fold the bundle in half so the knot is at the top and then grab another set aside strand to tie another knot toward the top of the bundle to form the tassel

Almost tassel ready!

 Use your needle nose pliers to open up a jump ring (I used 6mm size)

Loop it through an opening in your metal accent bead (you can use any type of accent bead/link here) and then squeeze the jump ring closed again

Tie the top of the tassel onto the jump ring with a double knot

Use E600 glue to apply a dab of glue on each of the two knots on each tassel

After the glue is dry use scissors to trim off the tails of each knot (I used smaller sharp scissors for this part to trim off as much tail as possible)

I then used my large scissors to trim off the uneven ends of each tassel so they were all of uniform length

Almost done!

Next grab an earring hook and use needle nose pliers to twist the loop open to the side

Attach the earring hook to the top of the metal accent in one of the loops and then squeeze the loop shut using pliers again

After your earring hooks are attached, your earrings are done!

Such a fun and easy project that makes a cute accessory to wear in the end!

Since I had so much time and so many metal accent beads, I whipped up a bunch in different colors and sizes.  I'm going to have a flash sale for them on my shop's Instagram page, and then will be listing more in my Etsy shop if you would just like to buy one instead of making your own ;)

Let me know if you make your own set, I would love to see some pictures!


Easy DIY Multi-Strand Strung Necklace

Learning how to make a basic strung necklace is one of the easiest concepts of jewelry making. All you really need is beading wire, a clasp, crimp beads, and regular beads! After you have the basic technique down you can alter the styles and shapes of your beads to make dozens of different kinds of necklaces.


To jazz things up even more, adding multiple strands to the same necklace gives you a designer looking necklace that still just uses one of the most basic jewelry designing techniques! 


Even though I love to experiment and try new techniques and ways to make jewelry, at the end of the day there is nothing wrong with a basic strung necklace.  This cute purple multi-strand necklace came together really quick and easy but now is the perfect accessory to wear with a plain purple sweater dress for a cute and girly outfit.


 Let me show you just how easy it is to make your own DIY multi-strand necklace!

Supplies:

I got all the supplies for this necklace from Cousin Corporation. You will need beading wire, crimp beads, a toggle clasp, split rings, split ring pliers, needle nose pliers, and wire cutters as well as an assortment of beads.  I used dark purple oval beads, dark purple round beads, silver spacers, light purple faceted tubes, and light purple faceted round beads.

Steps:

Start by cutting a long piece of beading wire using needle nose pliers 

DIY Metal Charm & Chain Necklace

I've had some time off lately for Christmas break and I am loving the fact that it has given me some more time to make jewelry and share my creations with you like this DIY Metal Charm and Chain Necklace!


Of course Christmas break has been filled with lots of other Christmasy things as well :)  My boyfriend and I split time between both of our families on Christmas Eve and Christmas day. It was great to see both sides of the family to eat lots of good food and squeeze in lots of BABY time too! I have three nieces now and the youngest one Felicity is 7 months old now.  I bought her a dumbbell rattle (affiliate link) for Christmas - how freaking cute does she look with it??? She's making gainz already ;) We spent Christmas morning with my boyfriend's family, Christmas lunch/afternoon with my family, which then left us surprisingly free on Christmas night! It was actually kind of nice to have some time just the two of us: this was only our second Christmas together so we popped some bubbly, opened our own presents, and then cuddled on the couch. Perfect Christmas night for me!

After all the festivities were over though I was back to my beading table.  Before I can show you what I made over this break, I have to play catch up and show you one of my last creations! I recently grabbed this basic long sleeve t-shirt dress for less than $20.00 from Forever 21 and needed a necklace to wear with it to fancy it up a bit.


So out came the beading supplies and the design wheels started churning and here is what I came up with!


An easy to make necklace that is flashy and sparkly enough to jazz up the dress but simple enough to still keep the outfit still semi-casual.  Here is how you can make your own version!

Supplies:

To make this necklace you will need 6mm rondelle beads, 3mm acrylic beads (I used both bicone and rounds), 6mm bicone crystals (not pictured), copper charm beads, copper chain, head pins, eye pins, jump rings, a lobster claw clasp, wire cutters, needle nose pliers and round nose pliers.

Steps:

To make the first strand of the necklace start by stringing one rondelle bead onto an eye pin. Use needle nose pliers to bend the pin back 90 degrees directly above the bead.  Use wire cutters to trim off all but about a half inch tail from the pin. Grab the end of the tail using round nose pliers and then bend it back around the pliers to form a loop.

DIY Crystal Cluster Earrings

These DIY Crystal Cluster Earrings are a beginner jewelry project that look professionally made but are easy and affordable to make - perfect to make for yourself or for a friend as a gift this holiday season!

For the first time in my life, I don't know what I want to ask for for Christmas.  I have people who want to buy me gifts, and I don't know what to tell them to buy me!!! I think I've finally reached the point of adulthood where if there is something I really want or need, I just buy it for myself. And as much as I love a new pair of boots or a cute new pair of workout leggings I actually think that I am GASP becoming less materialistic as I get older and am valuing the time and activities I get to spend with loved ones verses anything that can be found wrapped  in a box underneath the Christmas tree.

I'm sure I'm not the only one who has this problem - or maybe your problem is that you know what YOU want but have no idea what to get someone else on your list! If you are looking for an easy gift that, while still materialistic (hard to avoid during the Christmas season anyway it seems) still shows a little extra thought and care - consider trying your hand at an easy jewelry project to make a personalized gift!


I'm going to show you the basic tutorial for these cute cluster earrings below, but you can easily pick any type of bead or color to customize them to the preferences of whatever lucky lady is still left on your Christmas shopping list. I first made these earrings in a fuchsia color because I bought a cute new dress for less than $16 in this gorgeous fuchsia color and needed something to wear with it! Maybe that's another reason I can't think of any Christmas present I want...whenever I need new accessories for an outfit I just make them myself ;)

Here's how you can make your own version!

Supplies:

You will need head pins, 6mm crystal bicones, 4mm stone round beads, two earring hooks, two oval metal links, jump rings, needle nose pliers, round nose pliers, and wire cutters.

DIY Multi-Color Metal Necklace

This post may contain affiliate links

I've been all about the instant gratification jewelry projects lately.


Sometimes I love planning out a super in-depth project that has lots of different components and is very intricate and I know will take a lot of time in front of the TV to make (this DIY anthropologie knock-off necklacestatement necklace, and DIY cluster web necklace were all super time consuming!) I feel like I appreciate some of those pieces so much because I knew how much time I put into making them.


Lately though I just feel like life has been too busy to get wrapped up in another complicated project so I'm all about quick and easy projects that still turn out a beautiful piece of jewelry.  Between working full time, moving recently and having a longer commute, working out every day and still trying to maintain a social life, jewelry making often gets put on the back burner.  It gives me such joy whenever I finally get to have a little down time to create something though, so I've been trying to find enough time to sneak in some short but efficient crafting sessions.


The secret to a quick and easy jewelry project? Use jewelry components that are already full of design themselves so you don't have to do quite so much design work! I LOVED these multi-color metal link components from  Cousin DIY the first time I saw them and knew they would be perfect for a project.  I played around with a few different design ideas until I realized that the components had so much design in them already, I really just needed to keep the rest of the project simple! Best thing about simple? It's often quick and easy too :)  In just one quick crafting session I was able to whip up this funky necklace.


It only requires very basic jewelry making skills as well - so don't be afraid to give it a try! Here's how you can make your own version.

Supplies


Steps

Anthropologie Fringe Necklace Knock-Off

Would you believe me if I told you that you could knock-off this designer necklace from Anthropologie that retails over $300 for less than $20???


Because you totally can :) 

This "Axelle Fringe Necklace" retails for $338...

 My version? All you need are a few packs of beads, some chain, wire and patience you can make your own stunning statement necklace that looks designer but comes at a budget!

And believe me...this necklace looks AMAZING on. This started as just a knock-off project for the blog but now it's seriously my favorite necklace!

Let me show you how to make your own!

Supplies:

 All of my supplies came from Cousin DIY which can be found online or at most local craft stores. I used round beads, 24 gauge wire, chain, jump rings, a clasp, head pins, needle nose pliers, round nose pliers and wire cutters.

Steps: