Happy Harvest Bunting

I was digging through my archives recently to see what fall projects I posted about last year.  I was surprised to read this post where I talked about having a fall craft fest over labor day. Labor day! That was weeks ago. I JUST started my fall crafting for this year this past weekend.  Granted, I was REALLY excited for fall last year as it was my first full fall to spend with my hubby as I wasn't away at college. Anyway, I'm still excited for fall this year but I've just been a littttle slower getting started :)


For my first project for fall this season, I have a cute little bunting to share!

This is a very simple project - I'm sure you don't need a play-by-play, but here's a quick overview.  I used some scalloped circle paper punches, card stock letters (cut out with my Silhouette) and little mini red clothes pins.

I glued my letters onto my circles and I was ready to bunt away :)

When I was trying to rearrange my non-holiday decor with my autumn decor, I figured I might be able to make this charger work for fall.   It just needed a little jazzing up!

So, I grabbed some twine and attached my bunting to it!

I haven't quite figured out where to place it yet though...

Which do you like better?

I'm linking up with these parties:
Thursdays: Catch a Glimpse

What Jewellery Should I Wear For My Wedding?

As a jewelery maker and a "newlyish wed" I thought today's guest post from another Rebecca might be helpful to some of you! :)

Although a stylish and tasteful bridal dress is certainly one of the highlights of your wedding day, choosing the correct type of jewellery can help further accentuate what will certainly already be a truly stunning ensemble. However, accessorising in this way takes a bit of forethought and by following a few simple tips, you will truly be the belle of the ball.

Aim for Understatement
One of the mistakes that brides-to-be will often make is to place too much emphasis on the jewellery itself. While wearing a brooch pin that has been handed down for generations may seem to be a good idea, too many accessories will detract from the pristine nature of the dress itself. Instead, choose subtle and yet classy pieces. This will allow the entire outfit to appear tasteful without taking the guests' attention off of the dress. Simply stated, tiny highlights can go a long way.

Colour is Important
Assuming that the bridal dress will be a white or off-white shade, there are different metals that will work well with each hue. Gold jewellery worn with a pure white gown may slightly clash. It is a better idea to stick with silver, pearl and platinum. On the contrary, an ivory gown works quite well with gold accessories; the gold colour will help to highlight the nuances of this creamy fabric.

What Jewellery Should I Wear For My Wedding?
As can be seen in the below photo, strapless gowns are an excellent means by which you can accentuate a flowing neckline. Thus, necklaces should be avoided. Instead, pearl drop or chandelier earrings are a perfect fit for this choice. To balance out the lack of a necklace, Art Deco bracelets or placing a matching bridesmaid's flower in your hair will prove to be an excellent compliment.


Consider the Wedding Band
You should always remember that the wedding band will naturally receive a great deal of attention. So, it only makes sense to match the colour and lustre of the band with any jewellery that will be worn. However, this does not necessarily mean that the exact style of the band must be adhered to. Instead, choose a subtle bracelet and matching necklace to help accentuate the ring while balancing out your ensemble.

Vintage and Modern
Many brides will opt for more of a vintage look on their wedding day. As these gowns will normally boast a large amount of lace as can be seen in the below photo, 21st century jewellery can be seen as a tasteful contrast; a balanced melange between vintage and modern will certain be memorable.

These are but a few tips that will help you encounter the perfect jewellery to match this immortal
and memorable occasion.

Author: Rebecca is an enthusiastic jewellery expert who works at SamaraJames.com and prides
herself on her wedding knowledge. She understands the nerves in getting ready for your wedding
but you should always know that it’s your special day.

Your Whims Wednesday #130 {And Features}

Time for another Your Whims Wednesday Party!

Your Whims Wednesday

 Here are some of my favorites from last week:

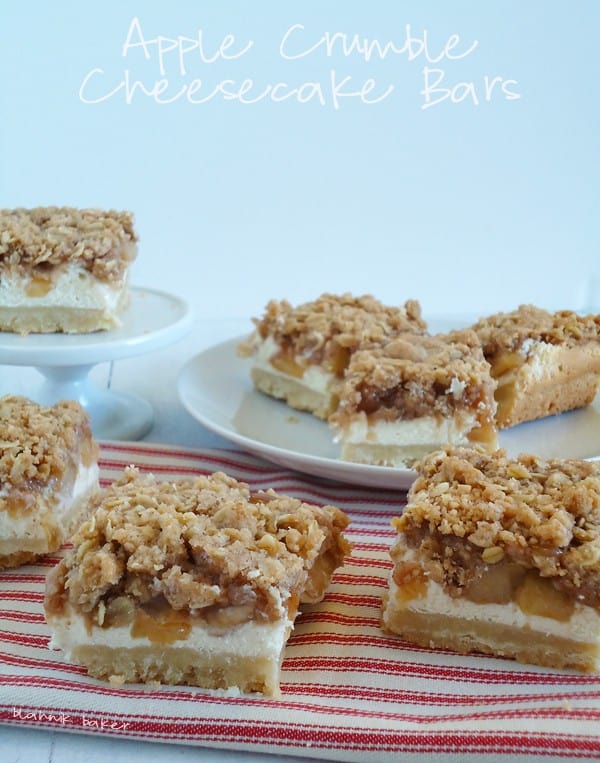
Apple Crumble Cheesecake Bars by Blahnik Baker
apple crumble cheesecake bars

Vintage Chenille Pumpkin by Sew Sweet Vintage


Ghost Costume by Kadydid Designs


Agate Sapphire Statement Necklace by DIY by Shruti

  Candy Corn Cupcakes by Raining Hot Coupons

Thanks to all who linked up! Grab a button if you were featured :)
 
Featured on My Girlish Whims
 
Now... onto this weeks party!

I show off my girlish whims weekly on my blog, and now I want to see yours with 
Your Whims Wednesday!

Guidlines:
1. Link up as many projects as you would like: as long as it is one of your girly ways, you can link it! I'd love to see crafts, recipes, style posts, etc. Anything and everything feminine :)
2.Please add my button (code at the top of this post) to either your blog post or somewhere on your blog. 
3. Take a quick moment to comment on at least one other entry. We we all love comments!! 
4.I'd love if you would follow me as well :)

Folk Art Multi-Surface Paint - Mail Organizer and Scissor Bucket!

Today I'm sharing two different projects in one post - because even though one project is made with wood and another metal, I used the SAME paint for each project! FolkArt just released a new FolkArt Multi Surface Paint which allows you to use one paint on many surfaces. Crafting just got a litttle easier my friends!

My first project was a cute little mail organizer!

I started with a plain wood organizer that you can get from most craft stores.

I gave it a nice coat of the FolkArt Multi Surface paint in red. To jazz it up, I used one of the new Handmade Charlotte stencils to stencil on a label.

I stenciled on the label using black paint because...

After my paint was dry, I painted over it with the FolkArt clear Chalkboard paint! You can literally paint any and make it chalkboard :) But I'm still a sucker for the classic black chalkboard so that's what I made.

All dried up and ready to chalk!

I used a chalk paint pen because they are easier to write with than real chalk :)

A super easy project, and it goes great with my kitchen colors! Probably cause I planned it that way....

For my next project I knew I had to find something else besides wood to test the paint out with. I was looking around my craft room and saw this cute metal bucket I grabbed from the Target dollar bucket:

I gave it a little facelift to use as a scissor organizer!

I didn't have any pink paint but luckily I remembered my kindergarten basics and mixed a little red and white together until I got a light pink.

 I used another Handmade Charlotte stencil for this project too!

Word to the wise: when you are stenciling, LESS is MORE! I originally used wayyyyy too much paint.

But I was able to salvage it and luckily it still turned out adorable!

Another great thing about this paint is that it is dishwasher safe and machine washable! You can find the Multi Surface paint and the new line of Handmade Charlotte stencils at your local Michaels.

If you would like a chance to win a FolkArt Multisurface prize pack and $100 Michaels gift card, enter below!!
a Rafflecopter giveaway
To keep up to date with all Plaid craft supplies, follow them on facebook, twitter, pinterest, and their blog!

Check out the other projects other bloggers have made!
This is a sponsored post.  All opinions are my own.

Your Whims Wednesday #129 {And Features}

Time for another Your Whims Wednesday Party!

Your Whims Wednesday

 Here are some of my favorites from last week:

Hello Fall Harvest Wreath by Made in a Day
Fall Square Wreath

Elephants and Patchwork Baby Items by Stubbornly Crafty
Applique elephant onesies & patchwork bibs by Stubbornly Crafty

Upcylced Maxi Dress by Vintage Zest

DIY Shelf to Serving Platter by The Rustic Redhead

 
Thanks to all who linked up! Grab a button if you were featured :)
 
Featured on My Girlish Whims
 
Now... onto this weeks party!

I show off my girlish whims weekly on my blog, and now I want to see yours with 
Your Whims Wednesday!

Guidlines:
1. Link up as many projects as you would like: as long as it is one of your girly ways, you can link it! I'd love to see crafts, recipes, style posts, etc. Anything and everything feminine :)
2.Please add my button (code at the top of this post) to either your blog post or somewhere on your blog. 
3. Take a quick moment to comment on at least one other entry. We we all love comments!! 
4.I'd love if you would follow me as well :)

Embellished Christmas Tree Frame Art

Tis the Season!!!

Ok, so it's not quiiiteeee yet the season.  Even though it's a little early (ok a lot early) I have some exciting news to share from Cousin Corporation so we can just start celebrating Christmas a little early!!

Cousin is launching their "Tis the Season" line in all AC Moore stores this month! The line is full of fun winter themed beads and Christmas components perfect for some holiday crafting. To celebrate, I got in the holiday spirit last week and started crafting with these light bulb beads and star beads from the line!

I came up with a simple little Christmas Tree Frame Art

I used embroidery fabric as my base and traced the size of a picture frame using an embroidery marker to gauge how big to make my tree. Next I cut a Christmas tree shape out of felt and used liquid stitch to attach it to the fabric.  I considered using a blanket stitch to secure it down (and you totally could!) but I decided to try to make this project a little less "crafty" looking.

After the liquid stitch was dry I put my fabric into an embroidery hoop and started to embellish with the tis the season charms!

Using embroidery thread I sewed on a star at the top of the tree

And then I sewed the lights to the tree as well. I loved these little beads! They were so fun to craft with.

 After I was done decorating my tree, I wrapped the fabric around some cardboard and put it into my frame!

Some of my other Cousin Ambassadors suggested adding some chain as a garland, or I even thought about stringing little red seed beads onto some string and adding them on like cranberries. Either of those two things might make a fun addition :)

Now I just have to wait a litttttle longer until I can actually use this to decorate for the holidays.  I haven't even put my fall decorations up yet!!

WIWW - Peplum Skirt Edition

It's been forever since I've done a fashion post! I was digging this outfit I wore this week though so I thought I'd share a What I Wore Wednesday again.

One of the nice things about my hubby getting a new job after he was unexpectedly laid off is that we work pretty close to each other and met up at my parents house most days on our lunch hour! He leaves every morning before I even get up most days so getting to see him in the middle of the day if such a nice way to break up the day.  So this week I got him to snap a photo of my outfit while we were at lunch :)

Skirt: Target. Top: Shop in France. Shoes: Payless. Neckalce: Styled by Tori Spelling.

I got this skirt this week on clearance from Target for only 6 BUCKS. I was so pumped! I love peplum. It's so fun and flirty! And peplum for six bucks is even better :) Especially since its a stretchy knit and super comfy to wear to all day at work.

It took me forever to figure out what to wear with the violet color, but I finally settled on a dark gray shirt. I wore it with one of the necklaces from my Styled by Tori Spelling goodies I crafted with.


 It's getting to that point in PA where is slowwwwly creeping toward fall temperatures.  I wish it would make up its mind though - today there is a high of 91 but on Saturday the high is only 66. What?? I for one vote for fall to get here ASAP. But I guess in the mean time I will enjoy bare legs and arms and wait just a litttttle longer to get into full on crazy pumpkin spice mode :)

I'm linking up with The Pleated Poppy!