Purina One 28 Day Challenge

This shop is part of a social shopper marketing insight campaign with Pollinate Media Group® and Purina One, but all my opinions are my own. #pmedia #ONEDifference http://my-disclosur.es/OBsstV


You've probably seen me post about and mention our doggie Jefferson before, but just in case you haven't, he is a medium sized golden doodle and basically he is our child! We want to have kids one day but not for a bit still, so in the meantime hubby and I got a dog and he has, strangely enough, made us feel more like a family.

Jefferson is just about a year and a half old and is a great dog.  He has a lot of energy to play but then by the end of the day or the end of a busy weekend he will conk out and makes a great snuggle buddy as well. He sleeps with us at night too, usually he starts off on the ground by the foot of our bed but by morning time he's up laying on top of my pillow snuggling up my head.  It's pretty cute :)

Since Jefferson is basically our child for the moment we spend a lot of time talking about him and and worrying about his well being. We care a lot but we are not "crazy overprotective parents" or dog parent extremists. For example: he's still a dog and can sleep in his crate while we are at work and does not need to go to doggy day care. He also is a dog so hence it is ok if we just feed him dog food; no way am I going to cook him up his own meal of chicken and rice like I've heard of some people doing before!!

Even though I'm fine with feeding him dog food, I'm still careful with what I'm picking.  When we transitioned Jefferson from puppy food to adult food, Jefferson started scratching at his coat non-stop.  Something in the new dog food was having some very adverse side affects on our baby! Ever since then I've been much more careful with the brands of food I buy.

When I was given the opportunity to start Jefferson on the Purina One 28 Day challenge I was interested because I know Purina One is a reputable brand but just never happened to be one of the kinds I've brought home since starting Jefferson on adult food. So, I went out to Walmart (also available at Target, Petsmart and more) and lugged a big bad home and started Jefferson on the challenge to see if I could notice anything different about him after 28 days.

Jefferson was pretty excited to start too. Granted, as a dog he gets excited about MOST things including a nice dirty sock to chew on or someone walking past the window... but still haha. He's giving me a look in this picture because I told him to "wait" to eat.  He can only follow two commands: "sit" and "wait" but they are pretty useful ones know!

After I told him "OK" Jefferson started to chow down.  Really chow down! That was the first thing I noticed in the beginning of the challenge.  Jefferson really liked how the food tastes.  We always feed him twice a day: once in the morning and once in the evening around our meal times.  He normally would always wait until after we finished eating or until he got tired of following us around until he would start on his dinner.  Not anymore! As soon as that food bowl goes down Jefferson starts chomping.  I think he likes it more than his last dog food because in addition to the traditional brown hard kibble bits, there are softer flakier pieces that almost resemble chicken that gives some variety to the food!

As the challenge progressed I also noticed a change in Jefferson's energy level.  He's still young so he already is energetic, but I'm pretty sure this little guy has gained a good bit of stamina!  I've been taking him out jogging with me about twice every week and he ALWAYS is running right beside or in front of me, tail wagging and tongue flopping out the side of his mouth.  As soon as he gets his harness on he KNOWS what's coming! He already has his tongue hanging out the side of his mouth in anticipation in this picture!

One Saturday both Shawn and I took him for two separate runs.  Shawn took him for a shorter but faster run in the early morning (I workout everyday but jogging is NOT my strong suit. I need to take some walking breaks!!!) and then I took him for a longer jog/walk in the early afternoon.  I was a little worried if he would be able to keep up with me at the end, but no worry was needed.  I think Jefferson could have kept going wayyy after my lungs were ready to call it quits!

For a happy dog who now loves to eat his food everyday, has more energy and no negative side-affects, I'd say the 28 day challenge was a success.  I've already got an extra bag in the closet to keep the challenge going. Now all I need is a people food that will help give me the extra stamina for running so long ;)

Do you have a dog that is a big part of your family?? Take the 28 days challenge with Purina One and see what will change with your furry friend! Sign up with Purina One and get a $3 couple off your first bag of dog food. 

Your Whims Wednesday #168 {And Features}

Time for another Your Whims Wednesday Party!

Your Whims Wednesday

Here are some of my favorites from last week:

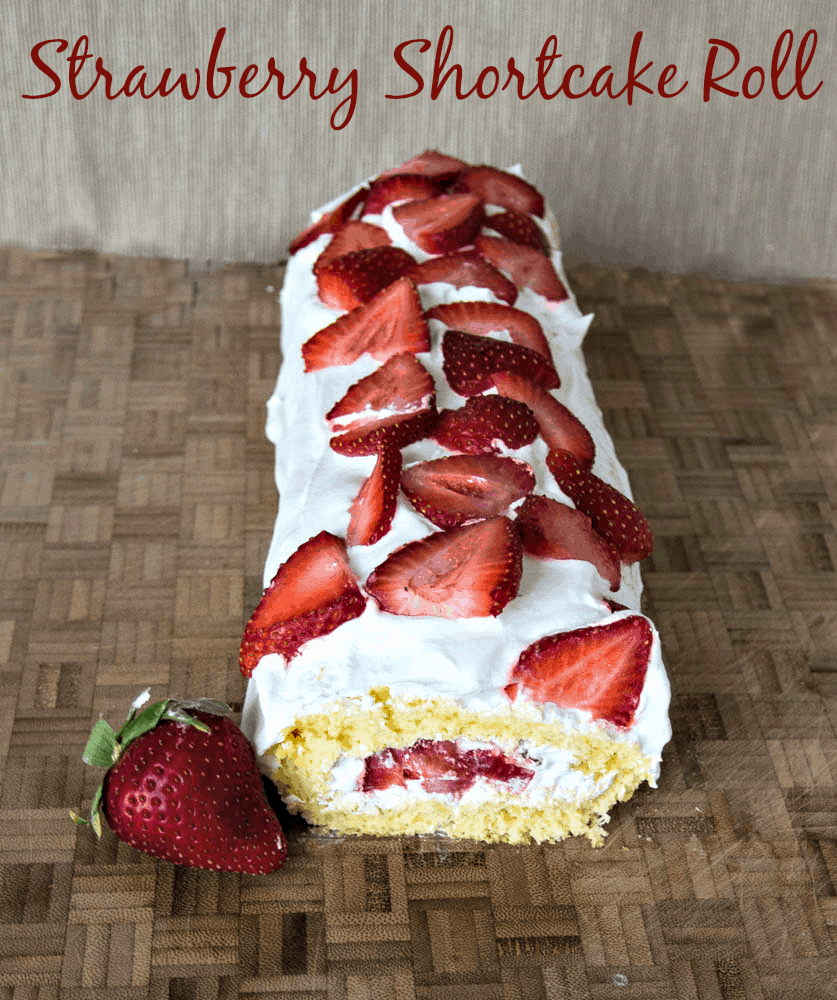
Strawberry Shortcake Roll by Upstate Ramblings
Strawberry Shortcake Roll - Strawberries rolled up in sponge cake with whipped cream
 
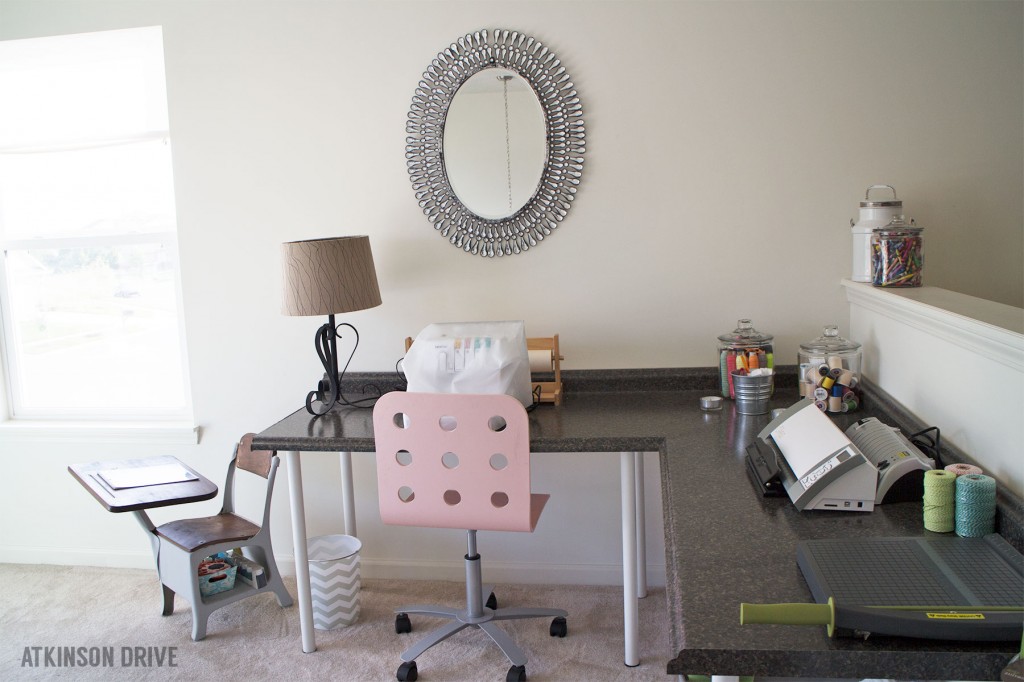
DIY Craftroom Desk by Atkinson Drive
DIY Desk (using countertop pieces and IKEA desk legs) | Atkinson Drive
 
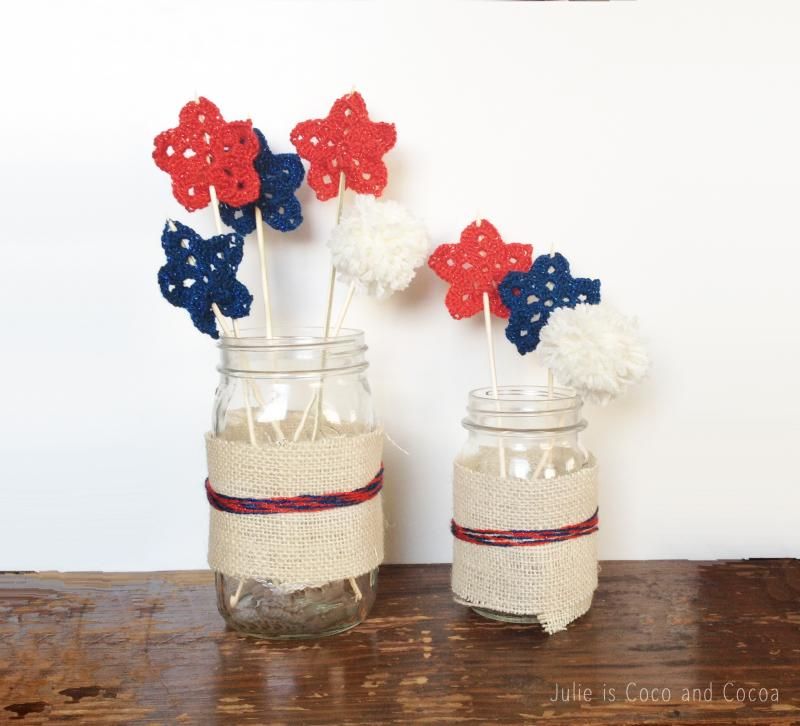
Patriotic Stars in Mason Jars by Coco and Cocoa
 
Koala Crochet Hat by Jenny and Teddy
koala crochet hat free pattern
 
Thanks to all who linked up! Grab a button if you were featured :)
 
Featured on My Girlish Whims
 
Now... onto this weeks party!

I show off my girlish whims weekly on my blog, and now I want to see yours with 
Your Whims Wednesday!

Guidlines:
1. Link up as many projects as you would like: as long as it is one of your girly ways, you can link it! I'd love to see crafts, recipes, style posts, etc. Anything and everything feminine :)
2.Please add my button (code at the top of this post) to either your blog post or somewhere on your blog. 
3. Take a quick moment to comment on at least one other entry. We we all love comments!! 
4.I'd love if you would follow me as well :)


DIY Pink Crystal Statement Necklace

Alright ladies...this next jewelry tutorial sums me up pretty well. It's got pink AND crystals AND it makes a statement. Sound like your cup of tea?? Even if it's not stick around, you can still use this technique to make other types of necklaces!


This is the second necklace I've made with supplies from Beadmixer (last crystal tutorial found HERE!) and I just love working with these crystals.  They make a statement however you use them, but I really had fun stretching my design abilities to make something a little different with this necklace for a fun statement piece.


Supplies
These pretty crystals from Beadmixer are the star of this necklace.  I used: pear shaped pink crystals, pear drop settingsoval pink crystals, and oval settings. I also snagged some pink connecters from my stash as well as some chain, jump rings and a clasp.

Steps
Start by placing the crystals into their respective metal settings and squeezing the prongs shut to hold the crystal in place.  Be careful to not scratch the crystal; if you're worried your hand won't be steady enough, you could dip your pliers into Tool Magic to protect the crystal.

Do this for all the oval crystals and pear crystals

Next it's time to lay out the design for the necklace. This part is a little confusing so I tried to lay it out as best as I could to show you.  I used a combo of small (4mm) jump rings and larger (6mm) jump rings. To make the necklace structure attach everything together as seen below:

 That way everything should lay flat and face forward. Use needle nose pliers to open the jump rings to attach everything together.

 Continue this pattern on either side of your first link like so:

Until you have a  full beaded bib necklace!

Finish off the bib with two more oval crystals. 

Use more jump rings to secure in place.

 Cut two lengths of chain to attach to either side of the necklace.  Use a 6mm jump ring to attach the chain to the top end jump ring on either side of the beaded bib.

 Last step is to attach a clasp to the chain ends! I also included a small extender chain to give me two different length options.

After the clasp is on you've got yourself a new pink and sparkly and girly necklace!

I think this necklace would look great with a strapless maxi dress for the summer.  Of course I don't HAVE a strapless maxi dress. I don't even have a maxi skirt. I've been trying to find one I like FOREVER and just can't commit to anything.  Maybe this new accessory will spark SOME idea next time I'm out shopping so I can finally commit to one.

Until then I'm sure I'll be able to find something else to wear it with.  I mean come on, pinks the new black, right? Just like a neutral? No? Oh, maybe that's only one of my girlish whims then ;)

Your Whims Wednesday #167 {And Features}

Time for another Your Whims Wednesday Party!

Your Whims Wednesday

Here are some of my favorites from last week:

S'moreo Brownies by Life With the Crust Cut Off
Smoreo Brownies

  Pink and Gold Dresser Redo by It's Always Ruetten
https://blogger.googleusercontent.com/img/b/R29vZ2xl/AVvXsEiSx3Kb_QztgKrat1SfG55gim0lwhAAvkxlVDA9vu7qpKO44WzCDB0csApajMzu7RmzHWYQTfmyL6VlEbBHG8lRfTjEkhs6g4PCPDfuc4ElH0GZooS5i31d4kih2r13ecfDPs6d2Jjjobc/s1600/Image+One.png
 
No Sew Table Runner by TitiCrafty
DIY No Sew Table Runner
 
 Easy Fish Tacos by Fluster Buster
Cheap and Easy Fish Tacos (Feed 4 for $5.27)
 
Thanks to all who linked up! Grab a button if you were featured :)
 
Featured on My Girlish Whims
 
Now... onto this weeks party!

I show off my girlish whims weekly on my blog, and now I want to see yours with 
Your Whims Wednesday!

Guidlines:
1. Link up as many projects as you would like: as long as it is one of your girly ways, you can link it! I'd love to see crafts, recipes, style posts, etc. Anything and everything feminine :)
2.Please add my button (code at the top of this post) to either your blog post or somewhere on your blog. 
3. Take a quick moment to comment on at least one other entry. We we all love comments!! 
4.I'd love if you would follow me as well :)


Five Months in and Going Strong

Well another month has gone by so I figured I'd do anoter weight loss update.  This is definetly the longest I've ever stuck to a "diet." I am so proud of myself! I think once you start seeing real results it gets addicting and you want to keep on seeing them :) You can catch up on my other posts here!

I last left off right before we left for Jamaica hitting the 30 pound bench mark. I really just wanted to mentally get to 30 pounds before our trip since it's such a nice round number!! We had an AWESOME time in Jamaica and it was such a nice trip to just relax and have fun.  It was also a nice break from my diet hah! I really didn't restrict myself at all.  We drank all day (hey it was an all exclusive!) and enjoyed eating some non healthy options too haha.  I did go running...once! Hey better then zero times. It was fun to run on the beach, such pretty scenery! There were also a lot of Jamaicans around, one of them yelled out "You gonna get fit girl!!" as I was running past.  Ya mon!

 
I was pretty scared to step on the scale when we got back...but I only gained three pounds!! I thought it was going to be so much worse! The morning of our trip I had actually gotten down to 32 pounds lost so after we got back I was at 29 pounds lost.  Very easy to recover from.

It's been a little over a month since my last update but I'm now down to 38 pounds down! Woot! I'm still doing the same thing, just eating healthy and tracking my calories and exercising every day.  I am so loving my Zumba classes, this week I burned over 600 calories during class! It's such a fun way to get in a work out. 

Here's another comparison from this gym selfie from last summer and now. I definetly do not have as much belly bulge as I did before!!

I'm also running/walking on the trail by my house a lot, about three days a week normally.  It's a for sure way to burn a lot of calories! Plus Jefferson my doggie loves going with me :) I posted this picture on instagram saying that the day before I had turned down donuts AND pizza at work (splurged a little on dinner later) but was still able to come home and try on another pair of jeans I havn't been able to get on in ages.  But I was out exercising again because I could get the jeans on but couldn't really MOVE in them yet haha.  

I love how easy it is getting for me to turn food down (especially during the week). Fat Becca would always eat what was being offered haha. Now I let myself splurge on the weekends so I know I need to be good during the week and be dedicated!!
 
I'm still actually enjoying finding more healthy meals to cook and eat.  I'll have to do a round up of some of my favorites, but here are a few thing I tried in the past two weeks:
 
I made this Mahi Mahi with a Bacony Corn Saute  (I called for hallibut but my grocery store didn't have any) and I am so proud of myself for cooking fish again haha.  I never really used to like seafood and now I'm eating and AND cooking it.  Man I'm so adventerous ;) 
 
Last night we made grilled shrimp tacos with a homeade avacado sauce...yummm. Shrimp is a really healthy protien...but also not cheap!!! I look for it when it's on sale at the store now to make something yummy with!
 
This week I also tried baked pineapple teriyaki chicken thighs from Budget Bites. This was a LOT of food but everything was pretty healthy! I couldn't finish it at all though which is probably good ;)
 
Last weekend I was able to get all dolled up to visit my hubby out at a World War II weekend he was volunteering at. They had a dance each night with swing music and I came out on Saturday night to keep him company. I got to curl my hair and dress vintage-esch and baisically feel pretty and more confident about myself now that I'm not so overweight!


Hubby was looking pretty handsome too in his uniform. Ow ow. 

 
I'm hoping by next month I will have surpassed another big "mental number" and will actually start sharing my real weight. Not ready quite yet for just blasting that out on the internet yet but maybe soon :)

DIY Bead Cluster Web Necklace

I've got another statement necklace tutorial to share!

DIY Bead Cluster Web Necklace
 

I've done a little shopping since losing some weight and starting a new job (any excuse to shop right??) and it seems whenever I go shopping I buy something that needs the perfect handmade accessory to go with it! I got a plain dark blue shirt from New York and Company that has some pretty ruching details on the sleeves but besides that it was pretty basic.  It was baisically calling out to be paired with a big fashion necklace! I gathered some supplies and tried out a new necklace technique and here was my result!

This necklace is fairly time consuming but I think so well worth it in the end!

Want to learn how to make your own? Here's how!
 
Supplies
Needed to make this necklace are: Chain, Jump Rings, Head Pins, Round Crystals, Large Bicones, Small Bicones, Round Beads and a variety of other blue beads. You will also need a clasp, split rings, split ring pliers, needle nose pliers, round nose pliers and wire cutters.

 This is the selection of beads I put together before I got started but I used more of some beads (crystals) and some not at all (the pearls in the round containers).  It depends on the size of your necklace how many beads you will need! Most of my supplies are from Cousin Corporation which can be bought at any major craft store or online at Prima Bead!

Steps
First step to making this necklace is to create the base for the necklace made out of chain. This part is a little tedious! Start by cutting multiple lengths of chain using wire cutters.  I measured the longest piece by holding it up against my neck to get a general idea of the length I wanted beads on for the necklace.  Cut the following pieces of chain in decreasing sizes. The longer you want the necklace, the more pieces of chain you will use so decrease less length.

Connect each piece of chain to the longer chain before it using jump rings. Open the jump ring with needle nose pliers, string it through both links of chain and then squeeze shut with pliers again. I did this for every single chain link.  You could probably get away with only linking together every other link, but make sure you always at least link the end pieces of chain so the necklace keeps its shape better.

Repeat this process row after row until you've reached the desired length for your necklace

Here's how the base of my necklace looked after all my chain pieces were cut and linked together with jump rings:

Next part of the process is to string a bunch of your beads onto head pins and then create a simple loop at the top to be able to attach them to the necklace base. You can attach the beads to either the jump rings or the chain base but I found it easiest to attach the beads to the jump rings.

I started with my larger beads first and spread them throughout the necklace while attaching. Repeat this process for your other beads paying attention to your spacing so the necklace will look like a good mix of beads at the end.

I attached a bead to pretty much every jump ring on the necklace so I got a nice and full result shown here! (PS: a lot of time elapsed between these two photos.  This will take you a bit!!)

Next you need to make your beaded bib into a necklace.  If I was to do this necklace over again I would have cut my first piece of chain to be the full length that goes around my neck.  But since I didn't and didn't feel like unattaching everything I just connected two smaller pieces of chain to the ends of my beaded bib.

Since this necklace it pretty heavy from all the chain and beads I used a split ring instead of a regular jump ring to attach the chain pieces for extra strength. If you have a set of split ring pliers it makes the little buggers a lot easier to work with.

Lastly, attach a clasp to the end of the chain ends.  I used split rings here as well for extra strength.

After the clasp is attached, your necklace is finished!

I love the look of cluster necklaces. While you are working on making the necklace it always looks a little funny but magically after you get enough beads on it always turns out fabulous!

This is the first time I've ever structured a necklace with this chain foundation and I really like the form it gives the necklace.  

 
I might just have to make another one soon in another color.  Guess I'll have to go buy more clothes to match then!