Today I welcome guest blogger Shruti - she's a jewelry maker like me and all her projects always get tons of clicks on my weekly link parties! Let's see what inspiration she has for us...
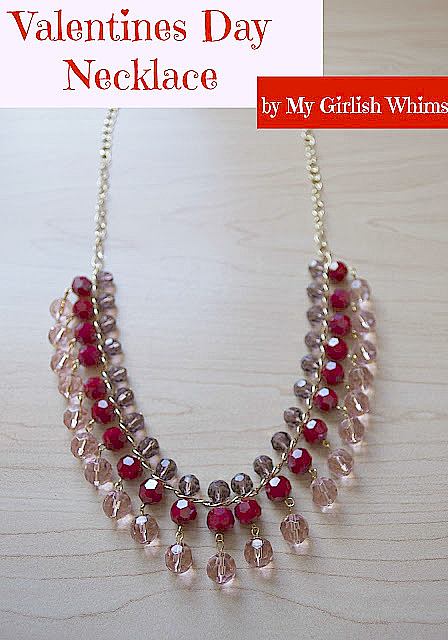
Hi all, my name is Shruti and my blog is shruti-diybyme. It's a new blog and I am loving all this blogging world. I would like to thanks Rebecca for letting me this opportunity as a guest blogger. She is an inspiration for people like me who are fairly new in jewelry making. My experiments with jewelry making started a few months ago and it has never stopped from there. I heart jewelry making and today I will show you this fun "Fringe necklace". It's simple to make and result is well you can see for yourself.

So, if you are interested in making one for yourself, here is the tutorial for you. Gather your supplies:-
Pink Pearls (from Bead show)
Head pins and eye pins
Silver chain
Clasp
Jump rings
Tools:
Wire cutters
Pliers
Nose pliers

Measure the chain around your neck, how long you want it to be and cut it (mine is around 16 inches)

Take your clasp, open the loop with the help of pliers and attach it to the end of the chain on both sides.

Your chain will look like this.

Take a head pin and put the remaining chain for cutting the fringes for your necklace like this. Head pin will help you to cut all the pieces alike.

Cut as many fringes you want in your necklace. I cut 16 for this necklace.

Now take a pearl and put it in an eye pin like this and make a loop above with the help of nose pliers and cut the extra with the wire cutters. (It's kind of difficult to take pictures of these step yourself).

This is how it will look like.

Connect one end with the jump ring.

Take a head pin, put a pearl on it and make a loop above it as we did with the eye pin and cut the extra with the wire cutters.

Connect both the pearls with the chain you cut earlier. Repeat all these steps for all the fringes and then start connecting it to the necklace with the jump ring. (The headpin portion will be the lower end of the necklace).

This is what your necklace will look at last.

Hi all, my name is Shruti and my blog is shruti-diybyme. It's a new blog and I am loving all this blogging world. I would like to thanks Rebecca for letting me this opportunity as a guest blogger. She is an inspiration for people like me who are fairly new in jewelry making. My experiments with jewelry making started a few months ago and it has never stopped from there. I heart jewelry making and today I will show you this fun "Fringe necklace". It's simple to make and result is well you can see for yourself.
So, if you are interested in making one for yourself, here is the tutorial for you. Gather your supplies:-
Pink Pearls (from Bead show)
Head pins and eye pins
Silver chain
Clasp
Jump rings
Tools:
Wire cutters
Pliers
Nose pliers
Measure the chain around your neck, how long you want it to be and cut it (mine is around 16 inches)
Take your clasp, open the loop with the help of pliers and attach it to the end of the chain on both sides.
Your chain will look like this.
Take a head pin and put the remaining chain for cutting the fringes for your necklace like this. Head pin will help you to cut all the pieces alike.
Cut as many fringes you want in your necklace. I cut 16 for this necklace.
Now take a pearl and put it in an eye pin like this and make a loop above with the help of nose pliers and cut the extra with the wire cutters. (It's kind of difficult to take pictures of these step yourself).
This is how it will look like.
Connect one end with the jump ring.
Take a head pin, put a pearl on it and make a loop above it as we did with the eye pin and cut the extra with the wire cutters.
Connect both the pearls with the chain you cut earlier. Repeat all these steps for all the fringes and then start connecting it to the necklace with the jump ring. (The headpin portion will be the lower end of the necklace).
I hope you enjoyed the tutorial and will make a necklace for yourself too I would love to hear from you. Do give me your suggestions and views. Happy crafting....
Shruti.....