PSA Stamp Winner & Sponsor

The winner of the PSA Essentials Stamp giveaway is....


Congrats! I'll be emailing you :)

Also, if you are interested in sponsoring My Girlish Whims in April, here are my current stats/rates!


Current Stats:
1148 followers
Approx. 1,200 daily blog page views
Approx. 33,000 monthly blog page views
532 Facebook Fans


Sponsor Package Deluxe: Receive a 300 x 150 ad spot on my sidebar, and one post introducing your blog, company, shop, etc, and another post with a giveaway if you would like! I will also make you the sponsor of one of my weekly link parties, Your Whims Wednesday, and put your button on that page as well. I will also help promote your blog/shop on my social networks throughout your sponsorship. 

Current Rate: $14 for one month or $28 for three months

Sponsor Package Basic: Receive a 150 x 150 ad spot on my sidebar and one post introducing your blog, company, shop, etc, wtih a giveaway if you would like! I will also help promote your blog/shop on my social networks throughout your sponsorship.
Current Rate: $10 for one month or $20 for three months.

Your Whims Wednesday #52 {And Features}

Time for another Your Whims Wednesday party!


Your Whims Wednesday


 Here are some of my favorite link-ups from the past week:

Mother's Day Flower Bouquet Cupcakes by Life is Sweets

The Hunger Games Cookies by Not Your Momma's Cookies

DIY Dr. Seuss Lorax Nursery by The Reno-Sparks Mom

Lemon Bars to Go by Lady Behind the Curtain


 Thanks to all who linked up! Grab a button if you were featured :)

Featured on My Girlish Whims

Now... onto this weeks party!

I show off my girlish whims weekly on my blog, and now I want to see yours with 
Your Whims Wednesday!

Guidlines:
1. Link up as many projects as you would like: as long as it is one of your girly ways, you can link it! I'd love to see crafts, recipes, style posts, etc. Anything and everything feminine :)
2.Please add my button (code at the top of this post) to either your blog post or somewhere on your blog. 
3. Take a quick moment to comment on at least one other entry. We we all love comments!! 
4.I'd love if you would follow me as well :)


DIY Wedding Veil - Repurpose Two Old Veils!

I have my very last wedding DIY project to share with you all today! I will be doing a round-up next week of all the projects I made for our wedding with pictures of them in use on the big day :)

I knew I did NOT want to buy a wedding veil. I did not feel like paying over $100 bucks just for some tulle. 

Luckily, hubby's mother let me use hers! Isn't it great??

Haha, ok. Well, maybe not great for the 21st century. It wasn't actually even a veil, but more of a wedding cap. Check out that poof on the top of my head!! Apparently my new MIL spent more on this hat than her actual dress!

Luckily, she was very nice and told me I could do whatever I wanted with it.  Cut it up including! 

So here was my game plan: use some tulle from her veil and use the pretty comb from my sister's old veil:

Not the best picture, but the comb had lots of sparkle and some little pearls that matched the beading on my dress perfectly!

I was actually very worried about this project.  I saved it until like two weeks before the wedding and was like....I know it can't be THAT hard but I've never made a veil before!! Luckily, it really wasn't hard and I figured it out easily.  I didn't take pictures of the process (bad blogger) because I was in my how-am-i-ever-going-to-finish-everything-for-this-wedding panic mode...so I just banged it out.  Here's a quick explanation though.

I cut off the top layer of tulle from the puffy wedding cap. I trimmed off the ugly finishing it had on the end and just did a clean cut and left the end raw. The tulle was shaped was like a very long rectangle with a curved bottom. 
 I grabbed a long piece of thread and ran it through the top of the tulle, and gathered the tulle to the middle.

I then took the ends of the tread and used it to start sewing the tulle onto the comb.  This is what it looked like from the back (not really the prettiest, but hey no one saw the back it was in my hair!)


The end result?


A beautiful veil for my wedding day - that didn't cost me a thing :) Horray for repurposing! And a MIL and sister willing to part with their old veils. 

I'll be linking up to these parties:

PSA Essential Stamps Review and GIVEAWAY!

Recently I was able to try out PSA Essential stamps. I was so excited to be able too! 
 
What makes these stamps really cool is that you really only need one stamp "base." The actual stamp part peels on and off of the base.  It's very easy to peel off and goes back on easy as well - especially with the help of the little guide that you see in this picture.  My monogram stamp (with my new name!) is sitting on there. 

This stamp came just in time...I'm in the middle of writing lots and lots of thank you cards from our wedding. I used the monogram stamp almost like a seal on the back of the thank you cards - I think it makes them just a little more important - right?? haha. And they are functional too, serving as a return address label as well!

I also got another pack of peel and stick stamps to try out.  I love all these fun designs:

Since my craft room is a mess from moving and I still don't have all my supplies moved over...I went with a very simple project with these fun stamps - cute little note cards!

I don't know about you but I'm always writing little lists to myself of things I need to get done. To give my notes a little face lift  I cut out a fun shape using my silhouette and stamped on one of the flourish designs as bullet points! Hung it up with some washi tape on my wall and now my to-do lists just look so cute, I'm sure I'll feel much more inspired to get things done :)

I even plopped one on the fridge as a little meal organizer for the week.  Hubby is just loving the pink ;)

I can't wait to play around with the stamps more - I'm sure I'll be able to think of some more creative ideas to use them!

You can buy PSA Essentials at the Cyber Savvy Shop who is having custom stamp sale for $26.50 (normally $40),  Peel & Stick packs are $10.50 (normally $15.00)  

GIVEAWAY!
I also get to give away one custom stamp to one of you lucky readers!
 
There are tons of fun designs to pick from!

Here's all you have to do to enter:
-Follow the PSA Essentials Blog (Required)
-Like PSA Essentials on Facebook (Required)
-Follow My Girlish Whims (Bonus!)

Leave a comment on this post for each entry.  Giveaway will be open until next Thursday, the 29th until midnight EST. Good luck!!

Your Whims Wednesday #51 {And Features}

Time for another Your Whims Wednesday party!


Your Whims Wednesday


 Here are some of my favorite link-ups from the past week:

New Kitchen Layout from Pike's Place

Jewelry Organizer from Pondered Primed Perfected

Jewelry Up-cycle form The Stories of A & Z and Little B

Bunny Burlap Banner from Uncommon


 Thanks to all who linked up! Grab a button if you were featured :)

Featured on My Girlish Whims

Now... onto this weeks party!

I show off my girlish whims weekly on my blog, and now I want to see yours with 
Your Whims Wednesday!

Guidlines:
1. Link up as many projects as you would like: as long as it is one of your girly ways, you can link it! I'd love to see crafts, recipes, style posts, etc. Anything and everything feminine :)
2.Please add my button (code at the top of this post) to either your blog post or somewhere on your blog. 
3. Take a quick moment to comment on at least one other entry. We we all love comments!! 
4.I'd love if you would follow me as well :)


Ode to Rhonda the Honda

Today, my 1993 Honda Civic is getting picked up by Junk my Car.

I'm getting $265 bucks for my little Rhonda the Honda!

That's pretty good considering I bought it when I was 15 for $1300 bucks with a summer full of baby-sitting money. 
This is from back when I graduated high school....when we thought it would be cool to paint on our cars and then lay on them and take pictures haha.


On this day of sadness, I will remember Rhonda the Honda with this Ode:
Side note: What makes an ode and ode? I sure don't know and don't feel like googling it. I'll just made my lines rhyme in pairs. Sounds good to me.

Ode to Rhonda the Honda
Rhonda the Honda was such a good car
She took me on journeys whose distances were far.
Back and forth Pennsylvania from college to home 
 Driving around lost (I suck at directions) on roads unknown
You only broke down once and left me stranded 
But then some strange men came and pushed me off the road four-handed!
The summer I got my license you took me to the beach
My poor passengers, that journey was a little bit of a reach
Driving across states and bridges so young
I don't know why my mother let me think that idea would be fun. 
I bought you so cheap I did not care that you had your flaws:
Peeling paint, ghetto cup holders, a wimpy horn, very close walls.
To me you were perfect my little clunky old Honda-
My first car that lasted for six years of automotive bliss with Rhonda.
And now that you finally broke and hubbygotmadandfrustratedandtriedtofixyoubutthenbrokeyoumoreandyousatapartinmygarageforaweekandthenhetriedtofixyouagainbutcouldn'tandyournotreallyworthputtingmoremoneyintobecauseiboughtyoufor1300dollarssixyearsagosheeshit'samazingyoulastedmethislongwhatagoodcaryouwere.
Uh....where was I?
Rhonda the Honda.
Proud owner from 2005-2012.
On this day you may by junked - but not forgotten. Your memory will live on in the clunks and clinks of old Honda Civics every ywhere.  

Side note: Oh haiiii new (used) car!

Planning on Planting!

This is a Sponsored post written by me on behalf of Scotts® for SocialSpark. All opinions are 100% mine.

If you haven't heard, hubby and I just moved into our first home together! I was very happy that our new home has two cute little garden beds out front and out back. I'm planning on trying out my green thumb and seeing how pretty I can make them this spring!

Since I don't have much gardening experience. I'm very excited to have the opportunity to sample the new Miracle-Gro® Expand ‘n Gro™ Concentrated Planting Mix! 

EnG Product Shot.png

Here are some of the great features of this new product:

-Up to 3X the Flowers and Vegetables!*     *versus native soil 
-Significantly improves soil for multiple years 
-Concentrated planting mix expands up to 3X when water is added 
-Feeds for up to 6 months 
-All natural fibers hold up to 50% more water than basic potting soil

Sounds pretty powerful! So maybe it's ok if my green thumb hasn't been fully developed...Miracle-Gro® Expand ‘n Gro™ will pick up the slack for me! We've had unseasonably warm weather around here lately, so all the perennials have come in early. Guess it's time for me to get planting too! Expand ‘n Gro™ can help you easily prep your gardens for the Spring and Summer seasons!

If you want to give it a try, Expand ‘n Gro™ is available at all major lawn and garden retailers and even online on Amazon.com!

If you would like a chance to win a FREE sample to try out, leave a comment on this post letting me know where you would use Expand ‘n Gro™!
Advertisement

Visit Sponsor's Site

Planning for St. Patrick's Day!

We're having our first little party at our new home tomorrow for St. Patrick's Day. Note: not a good idea to have a party in a home you have been living in for less than two weeks.  Luckily we got all our painting done downstairs....but it's all been a little rushed! And now we have a painted family room but no matching curtains or accent pillows or pretty candles....ok. I'm sure no one else will notice this but THESE are the things I think about haha!

Any whoozers. I figured I'd share quick today my plans for the party since if I share them after tomorrow they really won't be relevant any more! 

For food I'm planning on three items (friends are bring some other things as well):


 I'm going to make these yummy looking spinach roll-ups with spinach tortillas so they are green and festive!

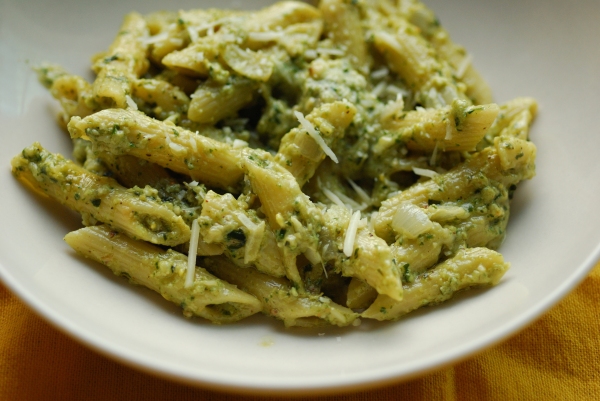
Pesto pasta  
I'm going to make some pesto pasta to stay green and in theme :)

                                                                         Source: flickr.com via MyGirlishWhims on Pinterest

And finish off with some mint chocolate chip cookies!

Also since it is St. Patty's day I will be making my specialty shot that I learned how to make when I was over in France. They referred to it as a "Shreck" but I couldn't find any pictures online. For you adventurous folk out there give it a try sometime: 1 part Baileys, 1 part mint liqueur (makes the whole shot green!) one part vodka.  Tastes like a peppermint patty going down!

For decor I'm just going to whip up some quick shammrock themed items:


                                                    Source: whipperberry.com via MyGirlishWhims on Pinterest

                                          Some cute shamrock flowers wouldn't take long to make!


And I think I whip up a little shamrock banner or two. I love these cute ones made out of felt! In reality though I'll probably just break out the silhouette and cut out a bunch at once to save time....since St. Patty's day is tomorrow hah! 

Lastly I got this fun shape from the Silhouette store for 75 cents. They will be fun to hang from the ceiling!

So, those are my plans! Anyone else having people over? Maybe just relaxing at home? I hope you have a good time celebrating regardless :)


This post sponsored by:
Protecting skin from the sun is a must,  but that doesn't mean you can't achieve a sun-kissed glow the healthy way.  The lightweight, oil-free, mess-free sunless tanning foam applies easily and dries quickly. 

DIY Wedding Flower Bouquets & Accent Flowers ...With some Talented Help!

Oh wedding flowers.  You normally cost way too much money! Hubby and I wanted to keep our wedding budget as low as we could so I knew going the traditional florist route for flowers would NOT be in the plan for use!

Here's what we decided to do instead: 
-The only live flowers we had in the entire wedding were the bouquets.  I think boutineers are a little tacky. My mom said she didn't need a corsage. I made the flower girl petals out of fabric. I decorated the church with fabric flowers. The centerpieces at the reception were made from tissue paper. So really, all we needed was bouquets!

-I'm all about DIY, but flower arranging isn't quite my thang. Luckily, one of my old roomates from college Erin (and dedicated blog reader!) has experience working in a florist and she offered to make the bouquets the day of the wedding if I gathered the supplies! Here's a close up shot taken after the bouquet making party:

 -I used hot pink roses for the bridesmaids and white roses for my bouquet.  I got the hot pink roses from Costco - a hundred flowers for right around a hundred buckaroos. It worked out great only after a minor scare that the flowers were stuck in Equador due to the Mardis Gras holiday.  After a little hyperventilating and angry concerned customer service phone calls, everything was sorted out and they got here on time.

(Wedding photo sneak peak! Still hoping to get my copies this week :) )


-I got the white roses from the local grocery store - just pre-ordered them to make sure they would be in stock.  They were on sale when I picked them up too - I got two dozen for $30! In hindsite - I should have done a litttle more research for my flowers.  The roses I got were more of a cream and my dress was white and not cream. Wasn't my favorite match, but not something that really mattered at the end of the day :) 


Did you notice those little silver and purple flowers sticking out? They were my only DIY contribution to the bouquets :) 


  I didn't want to just have roses, but didn't want to shell out a bunch more mulah for some accent flowers. 

Unfortunately these little buggers took forever to make and it was getting down to the last-minute wedding crunch so I did not take pictures of the process.  Here is a picture an elementary-age kid drew of the process though: (ok soooooo I actually drew it. please don't judge me....I craft better than I draw haha)

Basically I cut out a bunch of little square with left over fabric from my pew decor flowers. After they were cut into squares it was easy to free hand cut the flower shape. I burned the edges of the little flowers so they would curl up a little bit and not fray. Then I cut a tiny hole in the middle of the flower and set aside to make the stem. The stem was made with a long strand of wire: string a crystal onto the middle and then bend the wire past the bead and twist it around itself all the way down. String the flower onto the stem and put a little dab of hot glue on the back to secure.  Voila! I little accent flower to add in your bouqeut.

Whew? Got that? I thought they were a fun little touch to break up the roses.

Thank you Erin (and Kristen and Caitlin too!) for your bouquet help. I think total I spend around $175 for all my wedding flowers and supplies. Good deal to me!

This post sponsored by:
Got handmade crafts to sell but feeling lost on the internet? "Sell Crafts Online" delivers more than 500 tips, resources, and online stores for promoting things you make to sell.